Review Ryobi P882 Drill and Impact Driver Kit

Ryobi P882

This is a review of the Ryobi P882 Drill and Impact Driver Kit. I got it at Home Depot. It is a 18 Volt Lithium Ion setup. My previous cordless drill was a 12 volt nicad Hitachi which always seemed slow to me. There is a substantial increase in power with the new drill. I like the Lithium power-pack because the speed of the drill does not decrease as the power pack gets drained and they hold a charge a long time when stored. At first I did not like the color, but it is growing on me. It comes with a soft case, rapid charger and two battery packs. You can get larger battery packs, but I find the ones supplied last long enough for my use. The included charger rapidly recharges them in under an hour. Ryobi Lithium Drill P882


Ryobi P271Ryobi P271 top

The drill is a 2 speed range 0-440 rpm and 0-1600 rpm, 1/2″ chuck, 24 clutch settings. The chuck locks and has a long nose so it is easy to tighten and loosen. Has a level, storage for a driver bit, magnetic tray on the base to hold loose screws. I like the weight and how it fits my hand. It has enough power to drill large holes through oak.

Ryobi Impact Driver P234GImpact driver is variable speed, has locking chuck for  standard  1/4″ hex bits. It also comes with a 3/8 inch socket adapter for driving lag bolts, etc.. It acts like a regular variable speed drill until it meets resistance. Then it switches over to impact mode, giving it more torque. It really snugs fasteners down. Works great on lag bolts and fasteners.

This kit is a great addition to the tool collection of the  DIYer. I sold my 2 year old nicad drill when I got this one as it was such an improvement I didn’t want to be bothered with the old technology. Especially the nicads rapid draining when stored. Hope this review helps.

My youtube video of the un-boxing is here.

Review Campbell Hausfeld Air Hose Reel

CH Hose Reel

I purchased the Campbell Hausfeld PA500400AV  Retractable Air Hose Reel recently, and am quite pleased with it. This air hose reel review is what I have experienced. It comes with 50 feet of 3/8″ air hose on an enclosed reel. The hose feeds out and retracts smoothly. That is important to me. I have been using a regular hose for years and cursed it every time. Unless you twisted it to get the curl out, it would not lie flat. It was a hassle every time. This hose is a breeze to use. I can pull it out to my driveway. Hold on to the hose when it retracts though!

After using it for some time just sitting by the compressor, I finally mounted it on the wall. It does have a handle on top for portability, but it is better mounted to a wall. It does come with several lag bolts. Remove the bracket from the reel and bolt it down then reattach the reel.

IMG_1468It can swivel side to side. Sticks out from the wall 20″, 15″ tall and 8″ thick. I read an online review that they were concerned it does not have hose guides on the sides, just on the bottom. I don’t think this is a problem as it pivots in the direction being pulled.

IMG_1472I was concerned that it would not be able to provide the volume of air necessary for the impact wrench I use to remove lug nuts on my car. It had to be 3/8″, but I could not find the hose diameter anywhere. Even on the Campbell Hausfeld website.  From the pictures it looked smaller and it was not available in a “brick and mortar” store to look at. So I took a chance and it turned out to be 3/8″. Runs my air tools fine.  You can get it at Amazon  through  this link Air Hose Reel .

After mounting it to the wall I attached it to my compressor through a regulator/moisture filter. In the past I have had problems with the cheap regulators that attach directly to the compressor, so I got a better one, but it didn’t come with a bracket. I made a little holder for it and some accessories with 2 pieces of 1/2″ plywood. Coated it in polyurethane. The regulator just sets in it and seems stable since there is no stress on it.

So after getting everything mounted I am quite happy with my setup and no more cursing. At least at the hose.

air accessories


air accessories 2

How to Build a Funny Bird House

Miesel Creature Birdhouse

I bought these plans from Meisel and thought I would review building this funny birdhouse. My bird house is called “City Beatnik” and there are two different plans included for $15. They have many “old man” type plans. Even more animals. These are full size drawings.  Here is a book by the same designer on Amazon, but they are not full size drawings except for the smaller parts.

IMG_1401
Plans Funny Face Birdhouse
IMG_1403

I found the full size plans useful and they include a cutting guide to get the most from your wood. It can be cut from a 1″x 10″x 8′ piece of pine or cedar. I used rough-cut reclaimed lumber, which caused me a bunch of headaches, because it was cupped. I did like the rough surface.

Let me first say  I use power tools that I have acquired over the years. I understand that many do not have the room or money for these. I think this birdhouse can be built using a jigsaw. With it use a straight edge and a protractor to set the angle of the blade for the bevel cuts. Sandpaper, glue, nails and a way to bore the 1 1/4″ hole and you are set. It would great to build with a kid . I still remember building a birdhouse with my grandfather and that was long ago.

I started by cutting all my pieces to the correct length. Using a crosscut sled I made for my table saw made this easier. Remember to cut to the waste side. Then cut to width. Theses are your blanks to cut the required angles and bevels on. I used my miter gauge to cut the angles for the end pieces. I actually cut the first end, then traced it on the second blank, cut it on the band saw to save time. Since I made mine out of reclaimed lumber and had to glue two pieces together to get the width, I needed to keep the seam centered so it looked right. This made it more difficult.

IMG_1407
Cutting Birdhouse Roof
IMG_1408

To cut the bevels on the sides, I set the bevel on my saw and used the sliding mitre gauge with an extended wood fence to get the piece close to the gauge while keeping my hand far away. Since the piece was already the correct length, I gradually cut the bevel with repeated passes until the bevel was completed.IMG_1431IMG_1429

IMG_1433

I found it easiest to work directly off the main drawing. I got a bit confused how they     measured the angles, so I just used a protractor to measure them.
IMG_1432

Assemble the sides and ends. I used 18 gauge nails and glue. Titebond II is weather resistant. As you can see my sides are cupped. Custom fit the bottom. If you are going to actually use it for birds to live in, then you need to be able to remove the bottom to clean out the old nests. I put a screw in each side to hold it in place. In the picture, the bottom is square, the sides are not. Drill the hole next.

IMG_1438
IMG_1439
IMG_1441

Next comes the part that makes this more than just an ordinary birdhouse–adding the face. I had read about using Glad Press’n Seal to transfer patterns to wood and gave it a try. It worked great! Posted about it here. Using a scroll saw, I cut out the pieces, sanding them smooth on a 1 inch belt sander.

Transferring image with PressnSeal
IMG_1448
IMG_1449

After I had all the parts cut, I rounded the edges slightly. I used a 1/4″ router bit to round over the nose. Looking back, I wish I had rounded it over more. A file and sandpaper can get the same results. Now it is time to attach the face. I had an uneven surface to attach the pieces to. I glued the nostrils and the bottom of the eyes to the nose first. I actually drilled two holes and used screws and glue to attach the nose. I worked from inside the house using a stubby screwdriver. If you have a smooth surface, the screws probably are not necessary. Attach the rest of the parts as in the plans. I didn’t use the ears, because I did not like them.

IMG_1453
Attaching face to bird house

After the glue has set, attach the roof. I found it easier to join the two roof pieces before putting them on the house. Lastly, attach the two acrylic eyeballs. These you have to buy from Meisel when you buy the plans.

IMG_1447
Funny Face Birdhouse

In the end I am pleased with the results. The plans include a second birdhouse. I will make that one too, using new wood, saving me a lot of headaches.

Hope this has been helpful. Please post comments below. Especially if you have built a character birdhouse.

Using the Gerber EAB for 8 Years

This is a review of the Gerber EAB Lite razor knife. I love the Gerber EAB Folding Pocket Knife. Gerber 31-000345 E.A.B. Lite Pocket Knife, Fine Edge (amazon affiliate links) It is a great everyday carry knife.

I have carried it in my pocket every day for 8 years, because I would miss it if it was not there. I have carried a pocket knife of some sort since I was 12 years old. Back then it was a Boy Scout knife. In those days you could carry a pocket knife to school and no one thought anything about it. “Be prepared” was the motto. Now it is “Be afraid”

Gerber EAB closed

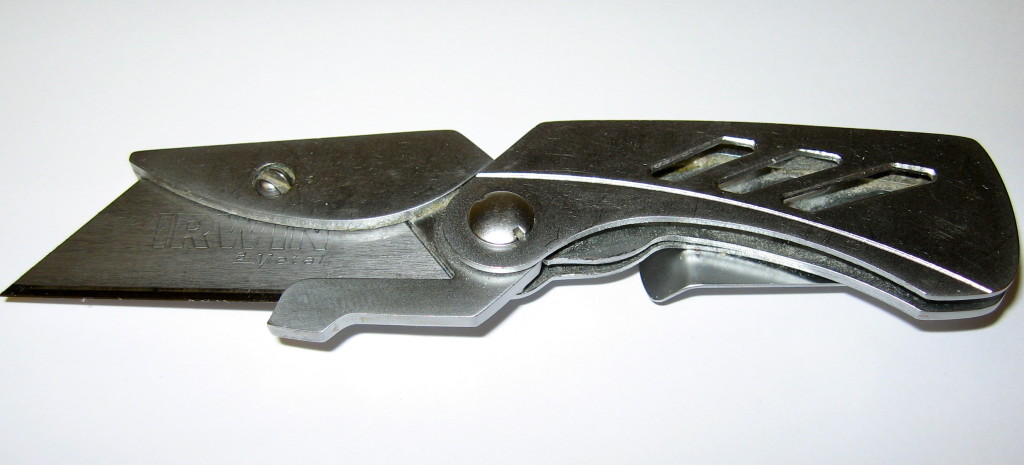
The reason I switched from a regular knife to a razor type knife is because I like a razor sharp blade. I can sharpen a regular knife very sharp, but it loses its edge quickly when using it on everyday things like cardboard. Cardboard and paper are really abrasive. Not to mention when you use it on tape, it gets all gummy. On the EAB, when your blade gets dull and nasty, just flip the blade over. Talking about blades, when you need to buy new ones, make sure you get ones that are not too long. If they are, the blade will stick out past the metal body of the knife when closed. It could easily cut you leg while in your pocket. The Irwin ones I have a picture posted of, are the right length and do seem to stay sharp longer.Irwin 2084200 Blue Blade Bi-Metal Utility Blade, 20-Pack

Gerber EAB Open

The one thing I do miss about a regular knife, is the ability to use its blade as a wedge. An example would be opening up a crack wider by inserting the knife edge and wedging it wider. A razor edge can not do that. If they added a flat blade screw driver to it, the EAB would be complete. It does come with belt clip I never use. Maybe Gerber could make a substitution.

Overall The Gerber EAB is a great everyday carry knife. I haven’t had one wear out in 8 years. I have lost one and given them as gifts. The one I have is the “lite” version. I guess this is because it has some grooves cut into it, trimming away grams of weight. I think it looks more cool than the regular version. Cool factor thumbs up! I would by it again in a heartbeat.