Wood Toy Cars and Trucks for Charity

Wood toy cars and trucks for christmas charity

Making toys for charity using scrap wood. Here are the 50 wood toy cars and trucks I made for Christmas charities this year. There are seven different types. I do different ones so I don’t get bored. Using a router table to round the edges is what gives the toys a finished look. Many are made by gluing baltic birch plywood together to get the desired thickness. Our club, Woodworkers of Whittier, gets scraps donated, so it is a good way to use them. Here is another post I did on making them Making Toy Cars. The club buys the wheels Here is a good place to buy wooden wheels and shapes in quantity california dowel. A hint- when drilling the 7/32nd inch axel holes, drill both holes from the same side all the way through. This keeps the wheels in the same plane, even if you end up drilling at a slight angle. If you don’t, all wheels may not touch the ground.

wood toy trucks for charity

Here are the trucks I made from common 2×4 pine. You do have to rip a lot of 1/4″ thick slats for the beds of the trucks. Here is the post showing the plans for this simple wood toy truck.


How to Easily Dehydrate Tomatoes

Tomato dehydrator traysThis is how I easily dehydrate tomatoes. If you grow tomatoes for the same reason I do, because there is nothing like a vine ripened tomato. The ones from the store taste like cardboard in comparison. There are so many varieties to chose from, so I grow more than one and they often come in 6 packs, I plant them all. What happens is a glut of fresh tomatoes. Here is one way I preserve tomatoes.

By dehydrating tomatoes, the flavors are concentrated. They taste great crumbled into salads, over pasta and added to spaghetti  sauce The room needed to store them is just a fraction of the original volume.dehydrating tomatoes

I do use a dehydrator. A simple one I have had for 20 years. I imagine you could dry them in the sun if the humidity is not too high. If you can’t dry them fast enough, mold will grow.Dried Tomatoes

To prepare, just wash and slice the tomatoes into 1/4″ thick slices, put in a single layer on the dehydrator trays, stack in the machine and dry until they snap when twisted. I suggest you do this in the garage- it does smell as the moisture is driven off. Store in freezer bags or airtight containers. If you store in the freezer they will last for years. You can also “can” and freeze tomatoes.Finished dried tomatoes

How to Flash Freeze Asian Green Beans

Asian Green Beans

How to flash freeze asian green beans from the garden or if you get a great deal on any fresh green bean at the market. I grow asian beans. I like this variety because it holds up to the summer heat and gives great production. The problem is they come all at once. It seems like you turn around and there is another foot long bean on the vine. Preparing asian beans is the same as any other green bean. By freezing them you can eat them most of the year. This works with other vegetables too. It is simple.

You need to blanch them in boiling water for just a minute or so, until they turn bright green. You need to do this or they will be rubbery when you thaw and cook them. I find an asian spider strainer like this one on Amazon (affiliate link) works great to get them out of the boiling water. Plunge them in ice water to stop the cooking. You just want to cook the outside. Put them in a single layer on a cookie sheet. Put in freezer for 10 minutes until the water on the surface has frozen. If you fail to do this, before putting them in a freezer bag, you will have a solid block of frozen beans.

By flash freezing the outside, they won’t freeze together. You will be able to take out of the bag just what you need. When I want to cook some beans, I take out a hand full place in a covered dish and add a teaspoon of water. Microwave for a minute and a half or steam them. Try freezing vegetables. It is a great way to preserve the taste a nutrients of fresh vegetables.

Review Hitachi RB24EAP Leaf Blower

Hitachi RB24EAP Blower

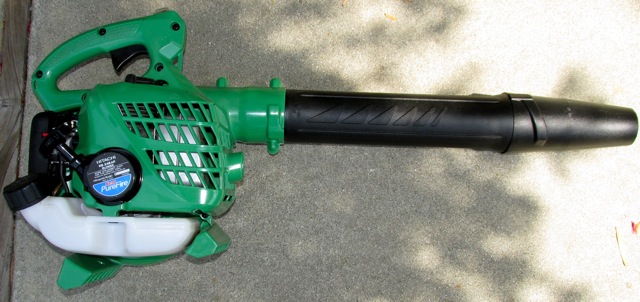
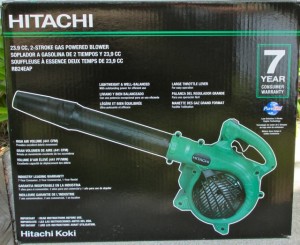
This is a review of the Hitachi RB24EAP Leaf Blower. I bought it six months ago and now feel I have enough time using it to give my views. I bought it off Amazon Hitachi RB24EAP 23.9cc 2 Stroke 170 MPH Gas Powered Handheld Blower (CARB Compliant)
and received it promptly. I read the reviews and knowing Hitachi to make good products I took the chance. I am happy I did. (NOTE: I did have to do a simple repair on this unit after 6 months. See it here). Update: I have now owned 1.5 years and it is still running great. It gets used once a week, 52 times a year as we do not get winter in Southern California.

Un-boxing it I noticed it was nicely made. With high quality looks and nice plastics used. It came boxed in 3 pieces. It was a very tight fit attaching the blower tube to the main body. I thought it was defective, but it was just tight. Putting the blower on its back and forcing the tube on worked. The nozzle attached easily. There is only one. A fan one would be a nice addition.

Hitachi RB24EAP Leaf Blower Box

After filling the gas tank part way with premix (it does not come with premix oil), I put the choke on and attempted to start it. I say attempted, because it would not start. With “Damn I am going to have to send it back” going through my head, I did some trouble shooting. In the end- I could see the intake hose for the fuel had shifted in transit and wasn’t sitting at the low point in the gas tank. It wasn’t getting fuel. Using a pencil I pushed it down to where it needed to be. this time it started after several pulls. It is an easy pull starter cord and doesn’t kick back like my old blower.

After starting I noticed it was quite at idle. Even after increasing the speed it is not that loud. It puts out a large amount of air. I am just using it to clean off walkways and driveways around the home. I can get most of it done just at idle speed. Revving it up increases the amount of air moved, not necessarily the velocity. I don’t know how good it would be on wet heavy leaves. I will find out soon enough. It works good for my needs.

Some of the cons- It is a bit heavy (8.5 pounds), bulky and gets tiring. But the work goes quickly. I use it on a quarter acre yard. If I had more, I would get a backpack blower. The choke and stop switch are reversed to what I am used to. The choke is on when it is down. Pushing up on the rocker switch turns it off. Turn the choke on to start and when it does back it off quickly as the engine will sputter until you do.

These cons are more annoyances. The pros are-It does start easily. When it is warm, it starts real easy with a quick tug. It is quite, well made. it even has a keeper for the gas cap. I can cleanup the yard quickly. That is what I bought it for and I would buy it again.

Build a Simple Toy Truck

Wood toy truck

This is how to build a simple wood toy truck made from a common 2×4 wood “framing stud”. Also can be made from scrap wood, the free Plans are included below. You find 2×4 framing lumber at any home center. Make sure you get the kiln dried (KD) one and check for straightness, the edges are not damaged, and looking at the end it is not “crowned” or it will make it impossible to cut straight pieces.

Left one is straight Right one is bowed
Left one is straight Right one is crowned
Wood pieces

The wheels are 1 1/2″ birch store bought wheels with 1/4″ axles.You can get them at a craft store. I find them in bulk cheaper on ebay, Don’t forget the axel pegs. You will need a table saw or band saw to rip the pieces.  If you use a table saw with a 1/8th” thick blade, you can get 2 trucks from a 20″ long piece of wood. Rip a 1 1/4″ wide piece. Move the fence 3/8″ closer to the blade and rip a 1/4″ piece and repeat. Now you have the ripped pieces for 2 trucks. See plans for dimensions of cross cuts.

Sanding is very important to end up with a nice result. This is easiest to do before assembly, I usually end using 120-150 grit. . It is important the wheel axel holes are not mounted too high or the wheels will rub the bed. Drill them all the way through.Get children involved. The truck is just glued together. A child could sand a little, help clamp the pieces, tap in the wheel axels. Have fun with it. Please email pics of ones you make, especially if they are modified. I build these for my woodworkers group charity build.
simple wood toy trucksimple wood toy truck

Stop Vacuum Smell

How to stop vacuum smell. You have one of the new vacuum cleaners that doesn’t use bags. Nice not to have bags, but now you have to clean filters. You get them all clean and put everything back together, ready for next time. A week, later after starting to vacuum, you smell a stench in the air. Your clean vac is now putting a bad smell in the air.

The problem is, when the pleated filter was rinsed, it provided moisture for mold and bacteria to grow. That is what it did while the vacuum sat and you smelled the result. To prevent this, you need to sterilize the filter. The pleated filter is almost impossible to get completely dry, unlike the foam one, so it must soak in a sterilizing solution. Fortunately everyone has it- bleach. Bleach kills microbes.Cleaning vacuum filter with bleach


Simply take your filters, place in a container and cover with water. Add a couple tablespoons of bleach and swirl around gently. Keep it out of your eyes! let set for 5 minutes, drain and rinse. Don’t over do it with the bleach, as it could damage the filters.

Sterilizing home vacuum filter in bleach

After rinsing, squeeze out the foam filter and let them dry. Preferably in the sun, as it kills bacteria too.

Drying home vacum filter

Doing these simple steps should stop the smell.

How to Build a Square Foot Garden Frame

Square foot garden frame

This is how to build a Square Foot Garden Frame from 2x6s and 4×4 lumber. Mel Bartholomew, years ago, wrote the book Square Foot Garden and this frame is based on his 4 foot square design. Any wider and you can’t reach to the center. You can find info. all over the web on designs. This is how I did mine.

I made the sides from 2″x6″ common lumber 43 1/2″ long. End posts are 4″x4″s  9″ long. When I do it again I will use 2″x8″ lumber for the sides to get more depth. Then the 4x4s will be 3″ taller than the sides.

Square foot garden frame cut
Posts Square foot garden

The posts are cut to a 30 degree angle for decoration. I used a table saw. You could use a mitre saw or even a circular saw with a cutting guide. Pre-cut the 4 posts and clamp them together for a stable surface, if you do it with a circular saw.

Attaching sides square foot garden
frame attached square foot garden frame

Using a Kreg Pocket Hole Jig I attached the sides. You could use dowels. Pocket hole screws were easiest. Since I didn’t used treated lumber, I don’t expect this frame to last forever. Using caulk, primer and paint will help it to last longer. I use thin strips of wood stapled together for the grid. You could just use string tacked to the sides.

Square foot garden frame planted
Square foot garden trellis

The best thing I added was a trellis to the north side of the frame. I grow beans and peas on this. It is made from 1/2″ electrical conduit you can get at any home improvement store. You will need two 10 foot sticks of 1/2″ metal conduit, four conduit clips and 2 corners. You will also need trellis netting. The conduit was cut 60″ tall for the sides and 45 1/2″ for the top. It is best to cut and mount the sides loosely first and then measure the top length. There can be variations.

trellis corner
attach trellis to frame

I have been using this frame for 4 years now. What I would do different. Make the sides with at least 2x8s instead of 2x6s. Deeper the better. Look around on the web on how to make the soil. I used some from a local fertilizer place and it was terrible. Locate the frame where it gets sun all day.